February 19, 2014

Sweet Home Chicago Baby Blanket


This has to be one of the easiest blankets I've made, and also the most popular.  I made my first one a few months ago while planning to make a collection to sell at a store in Chicago.  As I got busier and busier studying, then working, all while searching and applying for a full-time nursing position I didn't seem to be accumulating as many items to sell as I had hoped.  Between giving items to loved ones and making presents for the holidays I didn't seem to have extra time and yarn to spare for my little collection.

So a few weeks ago I decided that someone should be appreciating it either way and gave it to my dear friend and Chicago-native, Stacey.  She absolutely loved it and posted a picture to Facebook.  This led to a commission for a friend of hers to give as a baby gift.  And while exchanging the blanket in a nearby Starbucks, the woman next to us asked for my information to order one as well.  This baby is taking off!  


And of course it's a popular one, Chicago is a very unique place.  Although every city has love for their home and pride in the struggles and accomplishments of their home, Chicago has a fierceness in their loyalty.  You only need to watch two minutes of the local news to realize it's not the easiest place to grow up.  The weather is hot and muggy in the summer, cold and snowy in the winter.  It's not particularly forgiving. But for all those negatives, it forms strong and powerful communities.  

For us, it's been through Joe's rugby team.  They are as diverse a group as you can get- in age, race, occupation, and financial situation.  Yet not only do they come together to play as a team, they invest in their community by coaching local high school teams, helping each other find jobs, and encouraging their success.  They help and look out for not just each other, but their community as a whole.  It's amazing to be a part of this team. 

And though I would love to say that we are exceptional as a group, I don't think that's true.  I think you can find this community commitment throughout Chicago, whether you live North, West, or South.  We have only lived here for 2 years, but we've been welcomed into our community in so many ways- by rugby, by our neighbors at block parties, by friends we met through school.  Chicago has truly become a home.


Not to mention, Chicago brought us to our favorite Chicago-born dog.


Let's take a look at what that flag represents.  The white bars are the North, West, and South sides.  The blue stripes represent Lake Michigan and the north branch of the river for the top, and the south branch of the river and the canal for the bottom.  Each star represents a historical event in Chicago:  For Dearborn, the Great Chicago Fire in 1871, the World's Colombian Exposition in 1893, and the Century of Progress Exposition in 1933-1934. Within each of those stars, the six points also denote a point of pride related to the star's focus, ranging from their Latin motto "urbs in horto" (city in a garden) to values like Justice and Beneficence.


Keep reading to find the patten to make your very own Chicago blanket, or buy one here from my Etsy store!

The Pattern:

For the base blanket, I chained the desired width of the blanket.  The stitching is just a single crochet in each stitch, with a chain at the end of each row when you turn.  Super easy!  You can always shake it up by using a different stitch to make a more interesting pattern.

Dimensions: 

Each blue stripe is 1/6 of the height of the blanket, the middle white stripe is the height of two blue stripes.  I made my blanket about 36 inches wide and 24 inches high, making it a 2:3 ratio of height to width.  If you make yours a different size, just take your width as you crochet it, divide by 3 and multiply by 2 to get your full height.  Divide that by 6 to get your ideal stripe height.  For a 36" wide blanket, the stripes are 4" high.


The Stars:


Ch 6 into a magic ring to start.  

Round 1:  make 2 sc in each stitch, sl st into last stitch (12).  

Round 2:  Ch7, sc into 2nd stitch from hook.  In next five stitches, sc, hdc, hdc, dc, dc.  Sl st into 2nd stitch from where chain began, skipping one of the stitches.  Repeat until you have 6 points. Bind off.


Make 8 of these stars.  Evenly space 4 on each side and tack top and bottom point in place.  Line up the remaining four stars and tack in place on the opposite side.  I did this using a piece of yarn that I tied through both sides, and then removed once I stitched.  You could also tack with a permanent knot or temporarily with a marker.  Then stitch around perimeter of star, lining up both sides.


I hope you enjoy this pattern!  You can find it on Ravelry here.

Feel free to follow us on Facebook for updates on new posts and updates on baking, cooking, crafting, and more.


January 14, 2014

Twice-Baked Potatoes

If you've been around Charm Hour before (or know me in real life) it comes as no surprise that I love potatoes.  I love basically every starch, especially ones you can put cheese on.  This is yet another post where my two true passions of cheese and carbohydrates combine.  The premise of the twice baked potato is that you bake your potatoes, scoop them out and mash them, then put them back in the oven to get nice and crispy.  Just beautiful.

Now, I don't make these little treats too often.  They take more time and effort than your average potato dish, so it's a little bit of an act of love.  Like a night with family and a good steak, or showing someone you love them by feeding them.  But they're super delicious and totally worth it.


See that on the right hand side?  That's a pool of cheese.  Heaven in a potato skin.

You'll Need:

Potatoes

Sour cream
Cheddar Cheese
Salt and Pepper
Dash of milk

(or your preferred mashed potatoes ingredients)

Any extra fixings- bacon, chives, shredded cheese, etc.

The Recipe:

Start with the obvious- bake your potato.  A fork should be able to go into it without too much resistance when in it's done.  I honestly don't remember how long it takes exactly, maybe 45 minutes to an hour on 350.


Once they're done, slice them in half and scoop out the potato.  Put the stuff you scoop out into a mixing bowl.


Now mash those potatoes!  My mother's way involves a large dollop of sour cream (probably 1/4 cup for 2 potatoes) and some chunks of extra sharp cheddar cheese.  I also mix in a dash of milk, salt, and garlic pepper.


I use a hand masher, but of course you could use a mixer if you have one.

If you like an extra crispy skin, you can rub it with a little olive oil and rock salt to make it extra tasty.  Scoop your mashed potatoes back into the skins.


You can sprinkle the top with seasonings or shredded cheese if you like here.  I mixed my cheese into the mashed potatoes, so I just sent mine back in to bake at 375 for 20 minutes or until the top is nicely browned.


And that's it!  Top with chives or scallions if you're feeling fancy, or just keep it simple.


P.S. If you also love potatoes, we've got a few more recipes you can try:

Hearty Potato Soup
Scalloped Potatoes
Baked Sweet Potato Fries
Oven Roasted Potatoes  (with a dinner of filet mignon with goat cheese sauce)
Baked Potato Chips  (a snack while I made Irish Soda Bread)


The Granny Square Rectangular Blanket

After years of crocheting, I finally started getting into the granny style lately.  I recently posted a granny striped blanket I made for mom, but I hadn't posted anything with the classic granny square yet.  And then I finally made a granny square baby blanket only to give it away before taking my pictures.  So when I found myself in a pinch recently thinking of what to make for a lovely little boy I finally got to make something, take pictures of it, AND post it.  And that miracle comes to you today in the form of this granny square child's blanket.

Several months ago I was commissioned to make an American Flag Blanket for a newborn baby.  It took me longer than expected, and then after anticipating a few trips back to Ohio that didn't happen I ended up not sending it promptly at all leaving me feeling terrible about it.  I figured the way to fix this was to make them something extra to make up for the delay.  

the American flag blanket I ended up making (quite different from my original)

The little baby mentioned above has an older brother, so I figured he could certainly use a blanket as well.  Plus then he won't feel snubbed about not getting such a lovely surprise.  This blanket I thought should be big enough that a preschooler could curl up in it on the couch and be cozily tucked in- bigger than a lap blanket, but smaller than a throw.


What ended up was that the square I made got as wide as I wanted it to be, but I thought it should be a little bit longer so that his little toes wouldn't get cold.  I added some extra stripes to both end to lengthen it out without ruining the look.  


Of course, before we get to something that big we have to start with your basic little granny square.  For a helpful step-by-step on granny squares, I like this one by Bunny Mummy that is chock full of pictures.  Extra info for the stripes comes from here at Attic24, the source of my inspiration.


To Start:

Ch6, sl st into first stitch to make a ring.
Ch3, 2dc, ch2, (3dc, ch2)x3.  slip stitch into top of the chain to finish row.
This will give you that first inner row of four clusters.

Round 2:

To change colors I bound off at the end of each row and started my initial ch3 by slip stitching around one of the bars between clusters.  There are a number of ways to change colors and work in your ends, so feel free to experiment or use your own go-to method.

Sl st around bar, ch2, 2dc, ch2, 3dc.
In each of the other 3 bars, (3dc, ch2, 3dc). Sl st into top of initial chain.

Round 3:

Sl st into space on side (i.e. not a corner).  Ch3, 2dc.
In corner spaces, 3dc, ch2, 3dc. On flat side spaces 3dc.  After final cluster, sl st into top of initial chain.

Repeat round 3 for the remainder of your square, making a cluster in each side space, and 2 clusters separated by a 2 chains in the corners.


So you're ready to make it a rectangle:


With your next color, sl st into the right corner with the blanket side up.  Ch 3, dc into corner.

In each of the spaces along that side make a cluster of 3dc.

In the leftmost corner, make 2 dc.


With next color, start again on the right side.  Sl st between chain and dc in previous row, ch3. 

Make clusters of 3 dc in each space across the row, and at the end make 1 dc between the last 2 treble stitches.

Continue these two rows in alternating colors as long as you like.  Repeat on other end.  
Be sure to have your final row in the stripes be the same color as your last row in the square.

Final Touches:


Make a border around the entire blanket using the same pattern as the original granny square (clusters of 3dc in each side space, 3dc-2ch-3dc in each of the corner spaces.


When it comes to making clusters over the granny stripes portions, I stitched around the color I made the single dc with on each end (the color of your second stripe).


Finally, I did a row of dc in each stitch to give is a more solid edge.  There are many ways to edge a blanket so feel free to do a little googling or improvise!


I hope you enjoy this pattern!  

FYI: I used a size J/10/ 6mm hook and Loops & Threads Impeccable yarn,  but granny patterns are extremely flexible , so play around with whatever you like!  

As always, thank you for reading and sharing.  Feel free to check out Charm Hour on Facebook to see more updates on my various projects and adventures!

November 06, 2013

Hearty Potato Soup

The influx of cold fall weather has me wanting all the best comfort foods.  Especially all things cheese and potato apparently, because I just posted scalloped potatoes earlier this week.

This past Sunday was spent recovering from a fantastic rugby Halloween party, napping, and watching football (go Bills!), so it was the perfect day to mozy and work on soup, since it takes a little bit of time.       Now I will admit that I have never in my life made soup.  I don't even remember my mom ever making soup.  But with Joe's voice of confidence and my conviction that nothing with potatoes, cream, and bacon could go wrong I set out on my very first soup-making adventure.  It was both as easy and delicious as I had dreamed it would be, so I hope you'll give it a try.


This recipe was largely based on the Absolutely Ultimate Potato Soup from Allrecipes.  They even have a video if you want to see this baby in action. It takes maybe 1.5- 2 hours to make, depending largely on your chopping speed and how soft you want your potatoes to be.  This also allows some lovely time for Charm Hour (aka the time spent drinking, socializing, and snacking before dinner).

FYI: this makes enough soup for 8.  You can think about cutting that down, but you really should make the full thing and save it in tupperware.   The full recipe is at the bottom.


You'll Need:

1/2 lb bacon, chopped
2 stalks celery, diced
1/2 leek, chopped 
3 cloves of garlic, minced
8 potatoes, peeled and cubed
4 cups chicken stock 
3 TB butter
1/4 cup all-purpose flour
1 cup heavy cream
1 tsp dried tarragon
salt and pepper to taste


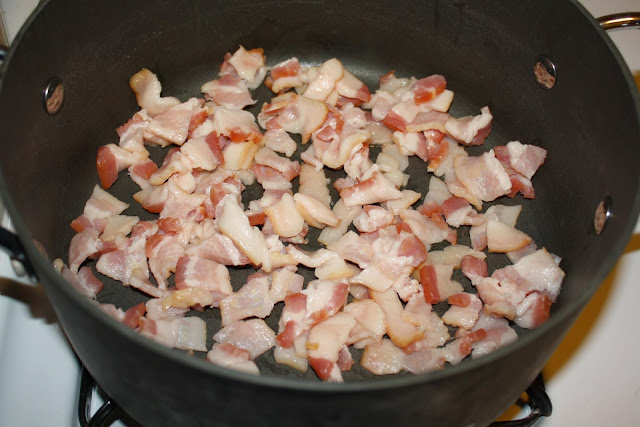
To start, chop up 1/3 to 1/2 of a pack on bacon and cook in a dutch oven/ large pot over medium heat.
You can always use more bacon, just pour off some of the bacon fat so you have about 1/4 cup left in your pot.


The pieces don't have to be too small, they'll shrink with cooking.  We also found it easier to cut multiple pieces at a time.

While that's cooking, get your chopping going.  Start with celery and leeks, as you'll need those first.  You can use onion rather than leeks, but I'm not much of an onion person.


Because leeks are these many-layered stalk-like veggies, they can trap dirt in between their layers.  The easiest way the clean them is to chop them all up, then drop them in a bowl of water.  The leeks will float, and your dirt will sink.  When it's time to use them, just scoop they off the top of the water.


Type of potato, peeling and chopping size are really up to you and what you like best.  I haphazardly peeled my gold potatoes, but you can go crazy and use not-peeled red potatoes, or whatever your heart desires.


Once your bacon is cooked, scoop it out and set aside on paper towel to keep it crispy.


Make sure to save about 1/4 cup of bacon grease in the bottom of your pot.  If you make more bacon, just pour off some of your fat.  I recommend saving it- it's great for sauteing green beans or frying an egg.


Throw in your leeks and celery and stir that around for a few minutes.  If you use onions, you'll keep those going until the onions become translucent.


Finish up chopping those potatoes and toss them in the pot with your celery and leeks.


Toss your potatoes around in the grease and vegetables for 4 minutes.


Add enough chicken stock (not broth- make sure it's stock) to cover your potatoes.  Cover and simmer until your potatoes are tender.


This next part only takes a few minutes, so wait until they're starting to get soft before starting it.

Melt 3 TB of butter into a metal skillet on medium heat.  Add 1/4 cup of flour, and stir until well mixed.  Whisk in heavy cream, tarragon, salt, pepper, and other seasonings to taste.  Keep whisking until thickened.

According to the original recipe and the comments of other cookers, the tarragon is extremely important to the flavor, and shouldn't be left out.  I also added garlic salt, and Creamy Peppercorn by Penzey's.  


Add this to your potato pot and stir until well mixed.  My potatoes were still not soft enough for my taste, so I simmered a little longer.  


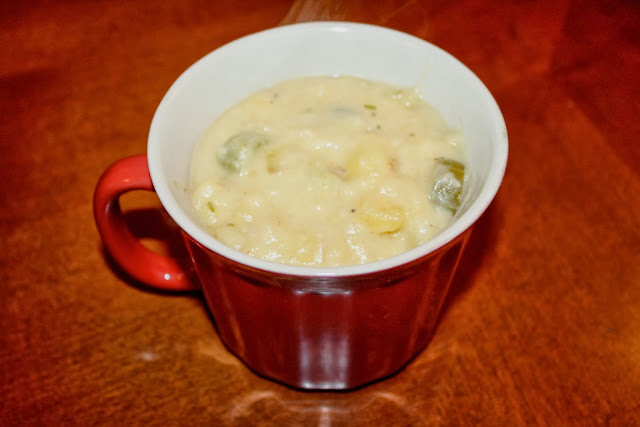
Once your taters are ready, use a hand masher to bring it to your ideal consistency.  I wanted my soup real think with not too many chunks, so I did a good bit of mashing, but you can do it as sparingly as you please!


As you can tell, my soup's really thick.   You can always add milk or chicken stock to thin it out without altering the flavor.

And now for those final product pictures:


Obviously, everything potato is better with cheese.  I used extra sharp cheddar.


And of course, the bacon.  Alternatively, you can add it earlier in the cooking process (i.e. when you add the cream mixture) to get more bacon flavor mixed in.  I chose to keep it for the end so it would be nice and crispy.  So many choices!


And because we ought to have more than just soup for dinner, Joe made up some roasted bone-in chicken breasts with an herb dry rub.  He's so wonderful.


The Recipe:

You'll Need:

1/2 lb bacon, chopped
2 stalks celery, diced
1/2 leek, chopped 
3 cloves of garlic, minced
8 potatoes, peeled and cubed
4 cups chicken stock 
3 TB butter
1/4 cup all-purpose flour
1 cup heavy cream
1 tsp dried tarragon
salt and pepper to taste

In large pot, cook bacon over medium heat until done. Remove bacon from pan and set on paper towels, but keep bacon grease in the pot.

Saute celery and leeks in bacon grease for 4 minutes.  Add potatoes and stir to coat.  Saute for 4 minutes.  Add chicken stock to just cover the potatoes.  Cover and simmer until potatoes are tender.

In a separate pan, melt butter on medium heat.  Mix in flour to form roux.  Whisk in heavy cream, tarragon, salt, and pepper.  Cook and stir until thickened.  Pour into potato pot and stir until well mixed.   Once potatoes are tender, mash with a hand masher until preferred amount of chunkiness.  Adjust seasonings to taste.  Serve and garnish with shredded cheese and bacon.