Showing posts with label pattern. Show all posts

January 14, 2014

The Granny Square Rectangular Blanket

After years of crocheting, I finally started getting into the granny style lately.  I recently posted a granny striped blanket I made for mom, but I hadn't posted anything with the classic granny square yet.  And then I finally made a granny square baby blanket only to give it away before taking my pictures.  So when I found myself in a pinch recently thinking of what to make for a lovely little boy I finally got to make something, take pictures of it, AND post it.  And that miracle comes to you today in the form of this granny square child's blanket.

Several months ago I was commissioned to make an American Flag Blanket for a newborn baby.  It took me longer than expected, and then after anticipating a few trips back to Ohio that didn't happen I ended up not sending it promptly at all leaving me feeling terrible about it.  I figured the way to fix this was to make them something extra to make up for the delay.  

the American flag blanket I ended up making (quite different from my original)

The little baby mentioned above has an older brother, so I figured he could certainly use a blanket as well.  Plus then he won't feel snubbed about not getting such a lovely surprise.  This blanket I thought should be big enough that a preschooler could curl up in it on the couch and be cozily tucked in- bigger than a lap blanket, but smaller than a throw.


What ended up was that the square I made got as wide as I wanted it to be, but I thought it should be a little bit longer so that his little toes wouldn't get cold.  I added some extra stripes to both end to lengthen it out without ruining the look.  


Of course, before we get to something that big we have to start with your basic little granny square.  For a helpful step-by-step on granny squares, I like this one by Bunny Mummy that is chock full of pictures.  Extra info for the stripes comes from here at Attic24, the source of my inspiration.


To Start:

Ch6, sl st into first stitch to make a ring.
Ch3, 2dc, ch2, (3dc, ch2)x3.  slip stitch into top of the chain to finish row.
This will give you that first inner row of four clusters.

Round 2:

To change colors I bound off at the end of each row and started my initial ch3 by slip stitching around one of the bars between clusters.  There are a number of ways to change colors and work in your ends, so feel free to experiment or use your own go-to method.

Sl st around bar, ch2, 2dc, ch2, 3dc.
In each of the other 3 bars, (3dc, ch2, 3dc). Sl st into top of initial chain.

Round 3:

Sl st into space on side (i.e. not a corner).  Ch3, 2dc.
In corner spaces, 3dc, ch2, 3dc. On flat side spaces 3dc.  After final cluster, sl st into top of initial chain.

Repeat round 3 for the remainder of your square, making a cluster in each side space, and 2 clusters separated by a 2 chains in the corners.


So you're ready to make it a rectangle:


With your next color, sl st into the right corner with the blanket side up.  Ch 3, dc into corner.

In each of the spaces along that side make a cluster of 3dc.

In the leftmost corner, make 2 dc.


With next color, start again on the right side.  Sl st between chain and dc in previous row, ch3. 

Make clusters of 3 dc in each space across the row, and at the end make 1 dc between the last 2 treble stitches.

Continue these two rows in alternating colors as long as you like.  Repeat on other end.  
Be sure to have your final row in the stripes be the same color as your last row in the square.

Final Touches:


Make a border around the entire blanket using the same pattern as the original granny square (clusters of 3dc in each side space, 3dc-2ch-3dc in each of the corner spaces.


When it comes to making clusters over the granny stripes portions, I stitched around the color I made the single dc with on each end (the color of your second stripe).


Finally, I did a row of dc in each stitch to give is a more solid edge.  There are many ways to edge a blanket so feel free to do a little googling or improvise!


I hope you enjoy this pattern!  

FYI: I used a size J/10/ 6mm hook and Loops & Threads Impeccable yarn,  but granny patterns are extremely flexible , so play around with whatever you like!  

As always, thank you for reading and sharing.  Feel free to check out Charm Hour on Facebook to see more updates on my various projects and adventures!

October 09, 2013

Karen's Striped Granny Blanket

One on the foundations of crochet is the granny square.  It's a motif made of clumps of double crochet that can be made into just about anything- the most simple being either a quilt of small squares or one gigantic square blanket.

granny square via Purl Bee

via EmpowerNetwork

Because of it's simplicity, it's also very versatile to being modified to make either elaborate squares, or as with this blanket, a more abstracted form.

I fell in love with the simplicity and sleekness of this blanket when I came across it on the Purl Bee.  Although I don't shy away from the cute or quirky, my mom has a much more classic sense of style.   She also likes things to match in a way I've never mastered.  We often joke that things have to be in "her colors"- dark brown, black, and gold usually.

Because of this blankets simplicity and sleekness, I thought it would be perfect.  Swap out that delicate alpaca yarn for a very sturdy yarn (Loops and Threads: Impeccable Solids), and you get something warm enough to survive my parents freezing air conditioning that also matches their decor.


p.s.  After all this talk about matching, let me just say that these pictures are taken on my couch, not my parents.  These couches have given up on matching and instead mean I can put basically anything in my living room and call it matching.


Ta-da!  Plus Oy very nicely modeled for me.

The basic premise is that the wider and taller granny stitch is interspersed with rows of single crochet in a contrast color.  I did my stripes at random intervals, but you could also make them evenly spaced, like in the original.


September 01, 2013

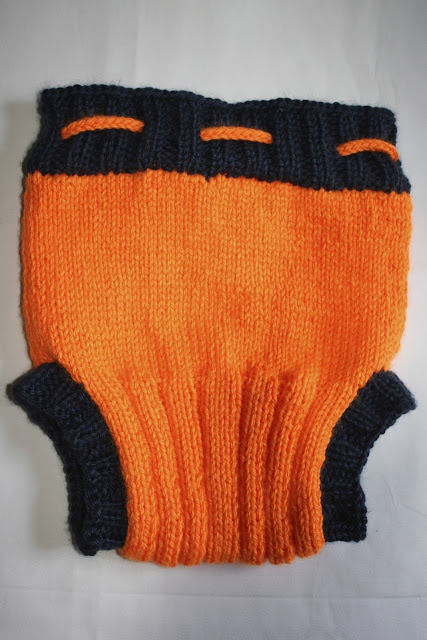
Sully's Knit Baby Bloomers

Our dear friends Stacy and Brian have what I believe to be definitively the cutest baby in the world, and his name is Sully.  As I probably have a decade before I want to create my own youths, I get to take out all of my pint sized crafty endeavors on him.  So far, they seem to be tolerating it pretty well.

One thing that I really like about little Sully is that he spends a great deal of time wearing only his diaper.  I mean honestly, I think most people would just wear their underwear if they could get away with it with no judgement.  Chicago in the summer is unbearably hot and humid.  Plus, if you already have to bathe your baby and he's only going to get food and spit up on everything why bother washing clothes too?

I figured that such a suave shirtless bachelor could use a little something to shake up his wardrobe without having to inhibit his manly cuteness.  And thus, this diaper cover was created!  For those special occasions when you can pull of shirtless-ness but want to class it up beyond the standard diaper.  Bonus points: it's Chicago Bulls colors.


You'll Need:

2 skeins of yarn in contrasting colors
3.25 mm/ size 3/ size D knitting 16" circular needles
DPNs


I used size 5 DPNs for the legs, as that's all I have, but the same size as the body would be ideal.
I used Caron's Simply Soft yarn.

The Pattern:

The Body:

Cast on 90.  Work in the round until you have about 5 inches, or your desired length from top of thigh (keep in mind the waistband will add to that height too).

To start the leg holes:  bind off 5 stitches, knit 40, bind off 5 stitches, knit 40, turn work.

At this point, we will be knitting a band out of one side.  The other side can be transferred to another needle, kept on your circular needle, or put onto a piece of string or other holding device for the time being.  I kept mine on the other side of my circular needle as it seemed the least work.

On purl side, bind off 1, purl across, turn work.  
On knit side, bind off 1, knit across, turn work.

Now we're going to do ribbing for between the legs.  If you opt not to, just continue to knit and purl until your desired length.  The ribbing gives you more flexibility with how big their diaper is.  If you used a different number of stitches, adjust the ribbing as needed to keep it symmetrical.

On the knit side: k5, p2, k3, p2, k3, p2, k4, p2, k3, p2, k3, p2, k5  (38)

On the purl side: p5, k2, p3, k2, p3, k2, p4, k2, p3, k2, p3, k2, p5  (38)

Repeat this ribbing until the thigh holes are the desired size.  Mine was about 9.5 inches long.  Stop when you're about to do the knit side.

K1, m1r, knit across until you have 1 left, m1l, K1, and turn.

If you're unfamiliar with m1r and m1l, they're a way to add a stitch that I explained here.


Merging the Body:

Starting a purl side row, turn the whole body to face the purl side and line up both sides.  Using a crochet hook if you have one, or another knitting needle, purl through a stitch on both sides.  Bind off as you go.  


bloomers inside out prior to seam 


 when seaming, purl through both front and back sides


 finished stitch

 binding off as you go


finished seam on the inside 


seam from the inside 


seam from the right side 


Leg Holes:

For the leg holes, use a contrasting yarn to make a ribbed ring.  

I used a crochet hook to pull up loops of the contrasting color one stitch in, and every other stitch apart. I then transferred these to DPNs.  If you don't have a crochet hook, you could pick up stitches to bind to using your DPNs, but it might look a little different, and possibly not as neat in the finished product.


 Make sure you have an appropriate number for the ribbing you do.  I did 2x2 (i.e. knit 2, purl 2), so I made sure my total number was divisible by four.

Continue the ribbing- in my case k2-p2- in the round until you reach your desired length and bind off loosely.  Mine were a little longer than 1 inch.

Repeat with the other leg.


For the waistband, use the same method as used on the legs to create loops several stitches below the top.  As before, make sure your number of stitches is divisible by the number of stitches in your repeated pattern.

I used 2x2 rib on the top as well, for about 2 inches in height.


Waistband Tie:

For the tie, I made an i-cord two stitches wide.  Weave this through the waistband.

This is optional, but it's cute, and will help keep your bloomers on if it's not exactly the right size.


And that's it!  Please let me know if you have any questions.

My final product is about 11 inches tall and 9.5 inches wide when laid flat.  
The gauge is 4.5 stitches wide and 6 stitches tall in a 1 inch square.


 a little size comparison


the backside


 the ribbed bottom


On a side note, while researching patterns I found of that people actually call these "soakers", which is weird and kind of gross.  I like "bloomers" much better, so we're going with that.


P.S.  This pattern is now up on Ravelry.

July 13, 2013

Crocheted Sunflower Coasters

A new pattern!

As I mentioned in my last post, it's been a long time since I posted something in the craft realm.  But I am back in the game with these little crocheted coasters.


For my final clinical of nursing school I'm paired up with an RN who I work with full time.  Fortunately for me, I was very well matched with my preceptor Lisa.  I didn't know it was possible, but I think she might dance in even more than I do.  Before I met her, my friend Beth described her as "smart and sassy" which is accurate but a definite understatement.  She keeps me laughing and dancing throughout our late evening shifts- even on weekends and holidays.  For someone I spend over 40 hours a week with, consistently ask foolish questions, and have to pester for help regularly she is unendingly patient and understanding, which is greatly appreciated on my end.  

So not only do I owe her a thank you present just for that, but she's also moving!  So this merits some extra crafting.  I've been long at work on another gift for her that's a little more sentimental, but I thought I'd add something that's both practical and a little funny. Considering she's allergic to sunflowers, I thought this just might fit the bill.  Plus it makes a cute little housewarming gift for her new place.


July 08, 2013

Sully's Knit Dragon

Holy moly has it been a long time.  It's been a week since my last post, but it's been a very long time since my last crafty post.  And this project has been in the works since probably February, so I am very very glad to have it finished finally.  Considering I have two dragonflies, a carrion beetle, a baby blanket, and a set of sunflower coasters in the works, it's about time something made it out of my progress basket.

I made it for the amazingly adorable baby Sully.  Last night Joe and I met up with his parents for dinner, so I decided to get my butt in gear and make his little legs so Sully could have something new to curl up with.  And because his parents are sci-fi lovers, he definitely needs a little magic monster. 


Pardon the fact the the flash brings out his stuffing- it isn't nearly that noticeable in person.  But because I was actually finishing his itty bitty dragon arms in the car on the way over, and then stitching them on while we were doing drinks and appetizers, I forgot about getting some photos to post until we were just about to leave and the sun already went down.  So all things considered, the pictures aren't too shabby.


The pattern can be found here on Ravelry.  It's a free pattern that's a few pages long with lots of pictures.  It's knit in the round on double pointed needles.

The only thing I remember changing from the original is that for the upper arms I cast on 6, did about 8 rounds, then did k2-kfb-k2-kfb, knit about 4 rounds, k2tog around, then tied off.  And I did yarn eyes.


And I could say this is for scale, but it's really because I think it's funny.  


May 27, 2013

American Flag Blanket

This project has been underway for a little while, but Memorial Day seems a good day as any to finally post it.


In art, I sometimes would pick a theme and create pieces within it. It gave me an opportunity to explore a concept from a few different angles and experiment with new things.  After my recent post about how my work might as well be art, I figured why not pursue it like art?  I got out my sketchbook and started brainstorming some new projects.  My plan is to create a mini portfolio of projects and hopefully start selling some, so why not create a little series?

I've been wanting to make an American flag blanket for a little while now, and I had all the yarn already, so that seemed like the perfect focal piece.  From there, I started working on some ideas with sports teams that fell flat, and then ended up at stuffed animals.  As a biologist, I loved ecology best- studying animals, ecosystems, and how interrelated nature can be.  I especially love insects.  My personal faves are dung beetles and safari ants.  One of my favorite quotes is by biologist J.B.S. Haldane, who said that "if He exists, God has an inordinate fondness for beetles".  There are over 300,000 different species of beetles on Earth (in comparison, there are only 10,000 species of mammals).  So at least the big dude in the sky and I have our love of beetles in common.  

I started my stuffed animals with two very large (probably a foot and a half long and wide) dragon flies.  Green Darners, to be precise.  A male and female with as accurate coloration and proportions as can be expected with yarn and a crochet hook. I also just finished up an octopus squid (octopoteuthis deletron) that is super adorable, and will hopefully be posted on soon.  Both of these species are native to America.  I'll fill in some more information on them once they're done, but suffice it to say- they're sweet.  Next up:  giant carrion beetle. 


Before I get more distracted, here's the blanket:


I tried to make the sides as wavy as the ripples- as if it was actually blowing in the wind.  Plus it's less boring than a flat one.


I made my ripples by doing 8 stitches, increase one, 4 stitches, increase one, 8 stitches, decrease one, 4 stitches, decrease one. Every other row was sc across to keep it from bubbling up.


For the blue section I followed the ripple pattern with blue yarn, and added the stars afterwards.  I just embroidered them with a tapestry needle as if I was drawing a star.


There actually are 50 start, all in the same pattern as they are on the real thing.


And then for some pictures with my obligatory model- Oy the American Pit Bull Terrier.  He even has his matching flag collar on today!


Happy Memorial Day everyone!  Remember that while you're out spending time with family and friends it's important to honor those in the armed services.